Livebinders for the Social Studies – Part 5

Livebinders for the Social Studies – Part 5:  Presenting with Livebinders

When it comes to presenting material to the classroom, there are several platforms to choose from – platforms ranging from Microsoft Powerpoint to Apple Keynote and a slew of others.  These platforms provide a means of organizing data and presenting it to the classroom.  I myself have previously used Powerpoint when providing content every now and then to the classroom, which can be useful if used to it’s fullest potential.

With that being said, one aspect that needs to bring special attention to your material/lesson is how engaged will it make your students in the classroom?  Thanks to Livebinders, students (and teachers) can now present the material they have created or put together to the classroom and beyond.

Livebinders provide a sense of ownership

Before we get into how you can present with Livebinders, you may be asking why you should be using Livebinders instead of the other options that are available?  Don’t get me wrong, I think platforms like Powerpoint and Keynote can be useful when used properly.  With Livebinders, however, students can create their own online portfolio and work on it throughout the year.  With Powerpoints, once it is completed, students don’t typically come back and build on it unless you design the lesson that way. Livebinders give the students ownership of their own learning and they are able to reflect upon what they have done.

Presenting with Livebinders

With Livebinders, you have the option of creating a presentation of your material.

To put your Livebinder in “Present” mode, first put your cursor over the “eye” on the top navigation panel:

When you do that, you should see a option to select “Present”.  Click on “Present”.  This will put your Livebinder into a presentation mode, which will look like this:

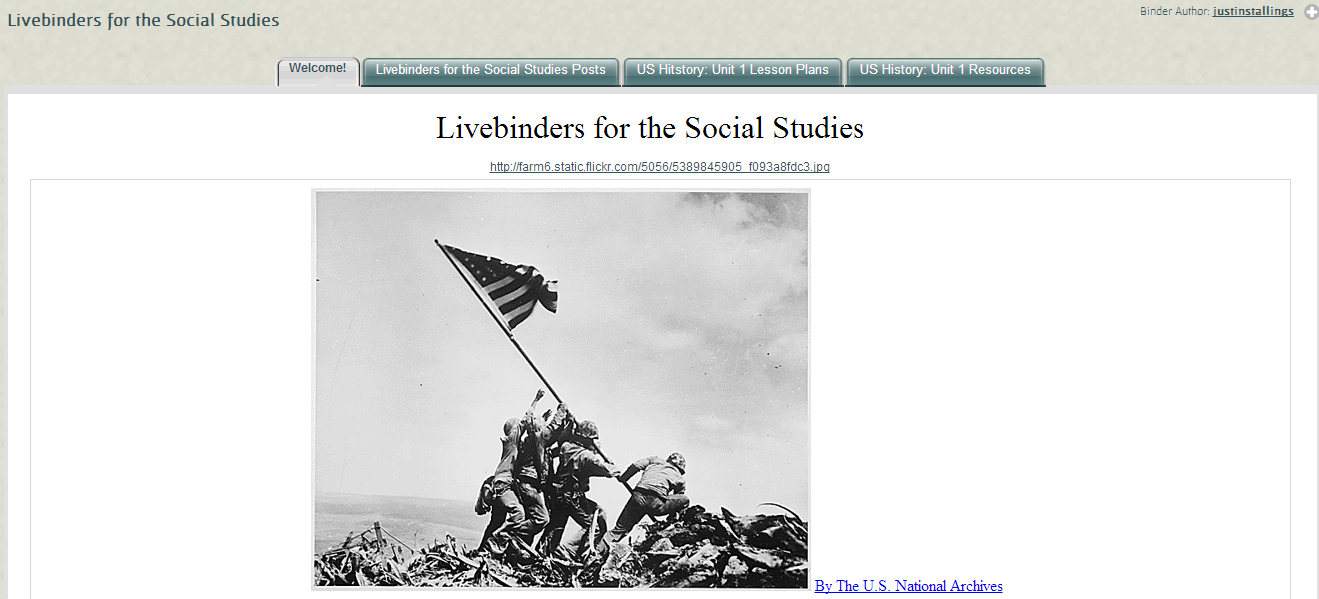
If you will notice, the “Present” mode gives your Livebinder more of a finished product.  You see the name of your Livebinder at the top left hand corner, the binder author at the top right and of course the material of your Livebinder being the center focus.

Using Livebinders also saves time.  You can fill your Livebinder with links to websites, videos and pictures. There’s no need to create a slideshow and insert images or videos because they are already in your Livebinder ready to go.  Students can use Livebinders to present the material or projects they learned throughout the entire year.

This will show how the student has grown and learned since entering your classroom.  Reflection is a huge part of the learning process.

If you have any videos, pictures or stories to share about how you have used Livebinders in your classroom, I would LOVE to hear about them.  Please feel free to DM on Twitter or Google + at @justinstallings.

Livebinders for the Social Studies – Part 4

Livebinders for the Social Studies – Part 4: Using Livebinders to build on collaborative skills

On the previous post on “Livebinders for the Social Studies” we looked at how you can use the “Livebinder it” tool and how to use Livebinders in general to organize and gather resources for lesson plans.  On this post, we are going to look at how students can use Livebinders to build on their collaborative skills.

When it comes to the Social Studies classroom, students take part in research projects on historical events or historical figures throughout the year.  Students research data in books, newspaper articles and, primarily, online content.  When you determine that your students will complete the project in groups, something you must consider is the “nuts and bolts” of how it will be done.  How are my students going to collaborate on the project?  What is the best way to make the project effective that will build my students’ skills?

With Livebinders, you can provide your students a central location where they can collaborate and combine their efforts to enhance their learning.

The benefits of using Livebinders

As a student teacher, I tried to engage my students as much as possible in collaborative activities.  One of the ways I used was creating a webquest and assigning responsibilities to where each group member had a responsibility (jigsaw method).  When I made the webquest, I hoped that my students would at least like the activity and have some fun while learning,  When my students started getting hands-on with it I realized how much they loved doing something besides something on paper or listen to me lecture.  What I also realized is how important it is to provide each student ownership of the project.

Livebinders gives you both the means of engaging your students and giving them ownership of what they contribute.  Livebinders also provide a means of collaborating and contributing throughout the year.  This is something they can constantly update and reflect upon.

Collaborating on a Livebinder

Livebinders provide a way to engage each one of your students and give ownership of the project to not one member, but to all.  Each student will have the opportunity to contribute to the Livebinder when they are added as a collaborator.  Whenever they find a resource, they can add it.  Each member of the group can add a tab to their group’s Livebinder and add content to that tab – which gives them part ownership of their group’s Livebinder.

Having your students do a project on World War 1?  One member can create a tab on the key historical figures, one can create a tab on battles and another member can create a tab on pictures/videos.  All of this combined into one Livebinder where the students can reflect upon their learning.

When students are engaged, the learning experience is enhanced.  This also has the potential of sparking interest in your students that may have not been discovered prior.  As a educator, these interests are key to providing the most meaningful lessons possible.

How to add collaborators to your Livebinder

Please note that each student will have to have previously signed up for their own Livebinder account in order to collaborate on any Livebinder. Click here to go to the blog post on www.livebinders.com about how to have your students sign-up for a Livebinders account.

There are two ways which you can add collaborators to your Livebinder.

The first, and quickest way, is to go to your “My Binders” tab. From there, place your cursor on the Livebinder you would like to add collaborators to – this will bring up three quick menu tabs (Options, Edit, Present).

You’ll then want to click on the “options” tab which will give you several options to choose from, including: share this Livebinder, collaborate, show details, link or embed, add to shelf, make a copy, edit it, present and delete from your account.

The option you’ll want to click on should be the second selection, “collaborate”.


Once you click on “collaborate” you will notice that the “Add or Remove Collaborators” selection is now on the left side of the webpage.

The second way is to add collaborators is via the “edit this binder” link once you open your Livebinder.  Simply open your binder, click on “edit this binder” link and then “binder settings”.

Once you get into the binder settings of the Livebinder, you’ll see the “add/delete” button where you can update your collaborators for that Livebinder.  


The collaborators that you add to your Livebinder will receive a email asking to approve to collaborate on that Livebinder.  Once they complete those steps, they will be added as a collaborator to that Livebinder.

Here’s an example of a Livebinder that was collaborated by myself and Jen Petras (@jenpetras) on Cyberbullying:


Cyber Bullying

For more details on having your students collaborate on a Livebinder, please visit this Livebinder created by Tina & Barbara, the creators of Livebinders:


Evernote and Professional Development

Evernote

Evernote for the Social Studies – Part 9: Evernote and Professional Development

Professional development is a key component for any educator, administrator or professional that needs to keep up with and provide the best expertise available.  Professional development can come in forms of workshops, conferences and any other form where people get together and discuss and train on issues in their field.

As one might expect, you may be taking several notes during this time to review and reflect upon afterwards.  Thanks to Evernote, you can create and organize your notes with notebooks and tags for quick and easy access.  Evernote also allows you to share your notes with your colleagues via social media or by the unique note URL.  Melissa Seideman recently used Evernote to take notes while attending  a conference for West Essex Regional School District.  Melissa was kind enough to share her notes with everyone via Twitter and agreed to let me share her notes in this blog as well.  Below is a part of her notes from the conference:

New Skitch

Click here to see the full note.

Using bullet points and bold headings, it is much easier to create a solid note to review and organize.  What is also great about creating notes such as this in Evernote is that anytime you make updates to the note it is automatically saved in the link you shared – no need to re-share the link.

How to organize your Evernote note

Here are some quick tips on how you can organize your notes in Evernote, making it much easier to review and access later on:

Note organization

Special thanks goes out to Melissa Seideman for inspiring this post!

Livebinders for the Social Studies – Part 3

Livebinders for the Social Studies – Part 3

Livebinders for the Social Studies – Part 3:  Collecting and organizing lesson plan resources 
 
Now that you have had a chance to see some excellent Social Studies Livebinders and see how they are used, let’s move on to the third Livebinders for the Social Studies post – collecting and organizing lesson plan resources.  I have also created a new Livebinder, Livebinders for the Social Studies, to show examples and work along side everyone as we go start going more in-depth into Livebinders:
Getting Organized
Livebinders provides a central location for all of your resources that you may have.  Regardless if you use Evernote, Dropbox, Google Docs or Microsoft programs such as Word or Excel, you can store those resources all in one Livebinder for quick and easy organization.  If you would like to add documents, pictures, etc to your binder, go to the “view” menu and click on “edit”.  From there, click on “Add Content” and choose the type of content you would like to add.
Livebinders also has a easy way to add documents from your Dropbox account and your Evernote account.
To add files from your Dropbox account, simply click on “Add Content” then click on “My Dropbox”.
For material from your Evernote account, you can add the link via the Livebinders app or get the URL to the note or notebook and insert it into the tab or subtab of your choice.  Click here to read the recent blog post from the Livebinders blog about the Evernote addition to the Ipad App.
Collecting Digital Resources
 
As educators, we run across multiple resources while searching the web.  Thanks to Livebinders, you can collect, save and share all of those resources.  To get started collecting your digital resources, the first thing you’ll want to do is install the “Livebinder It” bookmarklet tool, click here to go to that page at www.livebinders.com.

Once you have installed the bookmarklet tool and found a website you would like to add to your binder, simply click on “Livebinder It” and a new window will pop-up allowing you to select which binder to add it to:
Need to see some of this in action?  Please feel free to visit the Livebinder at the beginning of this post, Livebinders for the Social Studies.  I will be working on it going forward with the next posts so stay tuned!


Livebinders for the Social Studies – Part 2

Livebinders for the Social Studies – Part 2: 5 Excellent Social Studies Livebinders to see
 
On this second part of the Livebinders for the Social Studies series, I thought we should look at 5 excellent Social Studies Livebinders to get you familiar with how other educators and enthusiasts use Livebinders in the Social Studies field.
 
Social Studies Resources Central
 
This Livebinder from GValdez is full of resources to use.  It has everything from History resources, Economic resources, graphs and virtual field trips.
A House Divided
Andrew Weber has put together a excellent binder, which was voted as one of the top ten Livebinders in 2012.  If you need resources for the Civil War period in American history, this is the Livebinder for you.  It has everything from vocabulary, readings and online tools.
Ipad Apps for Social Studies
Looking for Social Studies Ipad apps?  Then this Livebinder from Angela Cunningham (@kyteacher) has you covered.  It has app categories from History, Civics and Government and Geography.
Black History Month
This is a wonderful Livebinder put together by kb…konnected.  It is full of lesson plans, printables and other resources regarding Black History month.
Lewis & Clark
This is a excellent Livebinder from wisermar covering resources over the Lewis & Clark Expedition.  If has everything you’ll need to cover this lesson in class – webquests, maps and clip art images.

Livebinders for the Social Studies – What are Livebinders?

Livebinders for the Social Studies – Part 1: What are Livebinders?

For over a year now, I have been guest posting a series of posts entitled “Evernote for the Social Studies” on this blog by Melissa Seideman.  There are still a multitude of uses that Evernote holds for Social Studies teachers and students that I have yet to blog about, and more posts will be coming on that subject throughout the year.

Along with Evernote, I have been blogging about Livebinders and how they can further engage our students in the classroom and assist educators in the teaching process.  This year, I also wanted to look at how Livebinders can be used specifically in the Social Studies classroom.

I will also be cross-posting this series on my blog, engagedwithtech.blogspot.com.

Livebinders – Your 3-ring binder for the web

Livebinders can be your one central source to collect resources, share resources, and collaborate with other educators and technology enthusiasts.  You can collect and curate resources that include: web addresses, documents, photos and many other things in your Livebinder.

In today’s classroom, students and teachers use the power of the internet to gather resources for projects, resources for papers and resources to share in the classroom.  According to livebinders.com, “Physical 3-ring binders used to be the easiest way to organize all your educational resources. But now so much of what you want to organize is online. LiveBinders not only replaces the old 3-ring binder, but also opens up new opportunities for collaborating, organizing, and sharing that were never possible before.”     

Here are some of my favorite ideas that students can use Livebinders for:

  1. Collect/organize blog posts – their own or fellow classmates
  2. Create a “My Evernote” tab – students can insert links to certain Evernote notes
  3. Research – students can use the “Livebinder It” browser extension to add a website link to their binder
  4. Comment on fellow classmate’s binders – Livebinders allow you to add comments to a binder, which is great for peer review.
  5. Upload lecture notes – whether it be a Evernote note link or a MS Word doc, students and upload/insert their class lecture notes.

Why Use Livebinders?

There a multiple reasons to use Livebinders in and out of the classroom.  It’s free and very easy to use.  The creators of Livebiners, Tina and Barbara (@livebinders), provide the best support I’ve ever experienced with anything related to technology.  They love to share other’s Livebinders and love to hear how what they created is making a difference.  

The problem with physical 3-ring binders is that resources and learning that has been done and collected with them stay in the binder.  Students have less of a opportunity to share what they have learned with physical binders, however, with Livebinders students can share via Twitter, Facebook, or by URL – thus giving students a multitude of ways to share with their fellow classmates.

Want more Livebinders info?  Here are some more resources:

Click here for my other blog posts about Livebinders

Livebinders website: www.livebinders.com

Here is one of my Livebinders for Social Studies resources:


Digitize Articles with Evernote

Evernote

Evernote for the Social Studies: Part 8 – Digitize articles with Evernote

In my newest post on my Evernote for the Social Studies series, I wanted to take a look on how Evernote can help History teachers digitize hard copy articles like newspaper and journal articles.

Even in today’s digital age, not every resource we run across is on the web or readily available as a electronic format.  With the Evernote app, anytime we run across a passage in a book, newspaper article or journal entry we can now quickly take a snapshot and save and organize it for future reference.

Here is a example of a newspaper article I ran across while visiting Taos, NM recently (snapshot taken with Evernote Android app and some cropping done with Skitch for Windows):

To see how this article looks in a Evernote note, click here.

skitch

How to access the “Page Camera” in the Evernote app

Page Camera 1

Accessing the “Page Camera” with your Evernote app (Android) is quick and easy.  Simply follow these instructions:

1. Go to your Evernote app on your smartphone/tablet and click on the notebook you would like to work in.  Once you are in your selected notebook, click on “New note”.

2.  Once you have opened a new note, click on the camera to activate your device’s camera.

Page Camera 2

Page Camera 4

3. Once you have launched the camera, click on “Page Camera” to mold your device’s camera to capture the article.  This will actually allow you to put the article in a bit more perspective from the camera view and narrow it down to exactly what you are needing to capture.  Once you have taken the picture, the Evernote app will then process it and make it as in-focus as possible for easy reading.

Now that you have captured the article, you can save it in your Evernote account and organize it by using tags.  You now have a hard-copy resource saved and readily available at a moment’s notice in your Evernote account.  Not only that, you can now share that note with anyone you would like by sharing on Facebook, Twitter, LinkedIn or by coping the note’s URL.

Source cited:

The Taos News – Taos, NM

Oct 3 – 9, 2013 edition (accessed Oct 21st, 2013)

Evernote for the Social Studies blog posts

If you have a moment, take a look at some of the other “Evernote for Social Studies” posts I have made here on this blog:

Evernote for the Social Studies: Part 1 – What is Evernote?

Evernote for the Social Studies: Part 2 – Evernote in History Class

Evernote for the Social Studies: Part 3 – Evernote & Skitch

Evernote for the Social Studies: Part 4 – Lesson Planning with Evernote

Evernote for the Social Studies: Part 5 – Evernote and Study Blue

Evernote for the Social Studies: Part 6 – Staying Secure with Evernote

Evernote for the Social Studies: Part 7 – Evernote Food


Part 7: Evernote Food

evernotefood

In this seventh installment of my Evernote for the Social Studies blog posts, we will take a look at Evernote Food – a fun and interesting app to capture, cataloged, and learn about recipes and all types of food.

What is Evernote Food?

Evernote Food (available for IOS and Android) allows you to build your own collection of recipes, take snap-shots and notes of meals, and search for restaurants in your area.  While some schools have restrictions on bringing food into the classroom, it may not be possible to have a “food day” to learn about what foods come from different continents and cultures.  From the teacher’s perspective, it would be just as simple to get some pictures of different meals that are enjoyed across the globe and present a Powerpoint presentation over it.  This, however, leads to little or no engagement.

Learning and Engaging with Evernote Food

When I was student teaching, I had a wide variety of students from different cultures and ethnic backgrounds.  Some came dressed every day to class with traditional clothing and was pleased to share some activities they do in their culture.  Even though we may not realize it sometimes, the best source of information is not always the internet – it is our own students in our classrooms!  With Evernote Food, students can now share what meals they have that are specific with their culture.

Evernote Food Home Page

Accessing the Evernote Food app from their IOS or Android device, students can explore recipes, create their own cookbook of their own recipes or recipes that they have clipped, explore restaurants, and access their “my meals” section where they have saved images and information on meals they have previously eaten.

With Evernote Food, students engage in the learning process by doing their own research and sharing what they have found.  Going back to the idea of having students capture their own meals that may offer a look into different cultures, Evernote Food makes that process quick and simple.

Evernotefood

When you create a “new meal” in Evernote Food, it provides this easy to use template.  You can choose to create a meal title, select the place which it was taken, type of cuisine, and create a tag for better organization in your Evernote account.  You can also input notes and snap shots regarding the meal into the same template.  This would work extremely well if it is shared in class or if the student shares it on the class website or blog – the explanation is already done in the template itself so students can begin reading about it as soon as they see it.

The great part about this is that you can also choose to share this meal information by coping the URL to it and sharing it that way, or you can share by posting to Facebook, Twitter, or Google +.  The unique URL would work especially nice because you could have your students copy the URL to their meal and submitting it to a designed Google Form or blog post.  And of course, once the student shares the meal either on a social media network or by simple URL, other students and teachers can save that information into their own Evernote account.

As a side note, once you have created the new meal, it automatically saves it into your default folder in your Evernote account.

Here’s an example of what a finished meal template looks like:

evernotefood 1

Conclusion

Evernote Food provides many ways students can interact and engage in learning that they may not have given much thought to before.  The main reason to use any technology like this is for the students to engage with what they are learning and with each other.  Students must be able to share what they have learned with their fellow classmates and teachers.  With Evernote Food, if you ever decide to have your students do projects over certain cultures or countries, let them go out and experience it and capture whatever it is that they are doing.  Whether it be traditional meals, dances or songs, students need to capture that moment and share among their peers.

If you would like more information about Evernote or Skitch, please visit my Livebinder, Evernote for Educators:

Explaining Lessons with Skitch by @justinstallings

 As some of you may be aware, the Texas Panhandle is covered in snow today!  I’ve decided to take this opportunity to talk a little bit about Skitch, a awesome tool from Evernote.

What is Skitch?

Skitch, initially a web tool on it’s own but later bought by Evernote, is a image markup tool that makes explaining images much easier.  It is available on Mac, PC, Android, and IOS.  You can markup images with text, arrows, highlights, and different shapes.

Here’s a snap shot of what tools are available from Skitch:


Explaining simplified

As I mentioned previously, the Texas Panhandle has been hit with a huge snow storm today.  With Skitch, instead of just saying what the snow is like, I can show you!

By simply adding the overlay of text and arrows, the image is already explained.  This also to engages students more than just listening to you explain it.  When the student sees the image and notice the text and arrows, they are already processing what they are looking at and what “snow drifts” are.

Skitch mobile

If you have a mind of a teacher, you’ll get a lot of ideas while you are out and about and want get a snapshot of whatever you find.  Skitch, available on Android and IOS, allows you to capture pictures via your smartphone and markup the image right there.  Plus, once you are done with the markup, you can share right from your smartphone to Twitter, Google +, email or several different other options.  Here’s a good video from Evernote.com about the Skitch app for Android (there are several other Youtube videos over Evernote and Skitch available at Youtube.com):

Skitch for Android 


Evernote and Skitch

Best of all, any image that you markup or capture will automatically be saved into your Evernote account.  Once you have saved the image, your image will be uploaded to your Evernote account where you can do editing with Skitch on your PC or Mac and share when you are ready.  Once it’s in your Evernote account, you’ll have it until you delete it.

Want more info on Skitch?  Here’s some more resources from myself and Evernote:


P.S.


If you are curious, here’s a another photo I took of the snow at my place.  I stand 6’6 and the snow drift was up to my knees:


5 ways to use Evernote in 2013


Happy new year!


As we begin a new year, some people might be looking for ways to “go digital” and have everything organized in a easy and simple program.  With so many tools out there today that allow you to do just that, one of my top picks is Evernote.  I’ve been using Evernote for a couple of years now and I’m still finding ways to use Evernote to organize everything I need to.  If you are curious about Evernote, here are 5 ways you can use Evernote in 2013:


1.  Organize your Tweets on Twitter

Planning on using Twitter a lot this year?  Twitter is my main social networking site for my professional development in education – and I’ve run across a multitude of resources shared from people I’ve followed.  So many resources in fact it would take weeks to go through them all.  If you are looking for ways to organize your tweets from Twitter, Evernote can take care of that.  First, you’ll want to follow @myEN on Twitter.  Once you’ve done that, @myEN will send you a link to sign in to your Evernote account and from there you can connect your Evernote and Twitter account.  From that point, simply put @myEN in any tweet you send and it will automatically be put in your Evernote account.

With that being said, however, there are apps you can use on your tablet/mobile device to share your tweets to your Evernote account.  Here is a blog post from Evernote.com that suggests some apps that will help you do that, “9 Things to Capture from Your Twitter Stream and Apps to Help You Do It“.

2.  Scan your paper documents into Evernote

Have a ton of paper documents that you wish you could digitize?  With Evernote, you can get make all of those hard copies into digital copies and organize them so you can easily and quickly access them wherever you are at.  I recently introduced Evernote to one of my former students and explained how it could help her with her studies and also catalog and organize her lecture notes (my full guest post about this, Evernote for the Social Studies: Evernote in History Class, can be found on Melissa Seidemann’s (@mseidemann) blog, notanotherhistoryteacher.edublogs.com).  Here’s a snapshot of one of her lecture notes that she captured with the Evernote app on her Iphone:

You can do this via the Evernote app or another app compatible with Evernote.  One app I recommend is CamScanner (IOS & Andorid), which allows you to share in the cloud and save as a PDF file.  Once you have captured the document on your mobile device, it will be in your Evernote account – which will be with you whether you are on your phone, computer, or tablet.  You can also scan documents into your Evernote account with other devices besides a phone or tablet.  Here is a list of devices that will streamline the process, truck.evernote.com/hardware.


3.  Clip articles while browsing the internet

Ever run across a interesting article or recipe on the internet and when you later try to find it you can’t?  With the Evernote webclipper, you can clip the article and have it whenever you need it.  Here’s an example of a article I clipped using Evernote:


What is also great about Evernote, is that it also provides a way to clip only the article without the clutter of the ads or page features.  Using Evernote Clearly (another browser extension), you can clip the article itself and get rid of any ads that are on the page that it is located on.  Here’s an example of how a article looks using the standard webclipper and the same article using Evernote Clearly: Standard vs. Clearly (links open in Evernote).  Either way, you can “clip” the article into your Evernote account and have a copy of it in your account.


4.  Explain with Skitch

It’s one thing to describe what you are talking about, however, if you are trying to explain something to someone it can be a lot more effective to show them what you are describing instead.  With Skitch, you can capture your computer screen or markup a photo and place arrows or dialogue on it to describe in detail what you are explaining.


Here’s an example I provided in another guest post on notanotherhistoryteacher.edublogs.com, Evernote for the Social Studies: Evernote & Skitch.  What is great about Skitch is that you can take the photo and mark it up directly from the Skitch app (available both on IOS and Android), which makes life a lot easier.  As with this photo that I took while at the Palo Duro Canyon, I am able to show what “Red Claystone” looks like.  This works especially well in the classroom in trying to accommodate your lessons to include examples of the topic.  Skitch, now owned by Evernote, also allows you to upload your markups and photos directly into your Evernote account.  This way, if you are on the run and want to snap a photo and mark it up later, you can easily access it from your Evernote account and modify it when you are ready.  You can also do the same thing while on your computer and want to show examples of something or even trying to help someone with tehnical support.


5.  Share your resources from Evernote with note and notebook links

Now that you have a plethora of resources, how do you share them from your Evernote account?  You have two options at this point, you can either a) share an individual note or b) share an entire notebook.  All of the following images were captured using Skitch for Windows PC:


If you choose to share an individual note, you can choose different options, as per the given example below:


If you choose to share an entire notebook (which you can do this by simply “right clicking” the notebook in Evernote you want to share and select “share notebook”), which is really useful if you use it to gather resources which you want people to be able to access at their convenience, you can create a public notebook link that will allow anyone to view or join the notebook:


Conclusion

Hopefully these are some good starting points for you if you are interested in using Evernote this year.  With so many different things you can do with Evernote, you’ll find out that it can make life much easier.  You can find out more about Evernote and about other apps that work with Evernote at: www.evernote.com.


If you are a educator and would like more resources for Evernote, please feel free to visit my Evernote Livebinder, Evernote for Educators:


Part 6: Staying Secure with Evernote

This is another wonderful guest post written by Justin Stallings. For more information about Evernote or Justin’s previous posts see below.

 A few weeks ago, a good friend of mine had his home broken into.  The important part is that he and his family were not in harm’s way and are safe.  Unfortunately, however, some items were taken from his home–including his laptop.  When that happened, it got me thinking about my own computer, tablet, and mobile device and what I should do if something like that should happen to me.

Not only have I thought about security of my devices themselves, I have also thought about security with my Evernote account.  Evernote is installed on my desktop, smartphone, and my tablet.  Because I have the ease of access with Evernote on all my devices, I also considered what should happen to my Evernote account should one of my devices were stolen.  Fortunately for Evernote users, there are several ways to have more security with your Evernote account.

What does Evernote say about security?

Here’s Evernote’s official statement regarding security:

Evernote is committed to protecting the security of your information and takes reasonable precautions to protect it. However, Internet data transmissions, whether wired or wireless, cannot be guaranteed to be 100% secure and as a result we cannot ensure the security of information you transmit to us; accordingly, you acknowledge that you do so at your own risk. Once we receive your data transmission, we make all commercially reasonable efforts to ensure its security on our systems:

  • Your Evernote password is protected by encryption and only you have access to it;
  • Your personal information and data stored in our systems is protected by various physical, electronic and procedural safeguards. It is housed in a secure facility and Evernote restricts physical and network access to this facility to select trained staff and regularly evaluates its technologies, facilities, procedures and potential risks to maintain the security and privacy of our users’ data. As a rule, Evernote employees do not monitor or view your personal information or content stored in the Evernote service, but it may be viewed if we learn that our Terms of Service may have been violated and confirmation is required, or we otherwise determine that we have an obligation to review it; and
  • Certain Evernote services support the use of standard SSL encryption to protect data transmissions. However, this is not a guarantee that such data transmissions cannot be accessed, altered or deleted due to firewall or other security software failures.

If Evernote learns of a security system breach we may attempt to notify you and provide information on protective steps, if available, through the e-mail address that you supplied during registration or posting a notice on our web site. Depending on where you live, you may have a legal right to receive such notices in writing.  

Source: evernote.com

Safety tips with Evernote Desktop

I do a majority of my work on my laptop–everything from blogging, researching on the web, and organizing my resources in my Evernote account.  For quick and easy access, I have the Evernote Desktop installed on my PC.  All I have to do is click on the Evernote icon on my desktop and I’m in.  With that being said, however, if someone were to steal my laptop it would be that easy for them to access my Evernote account (besides of course if they were somehow able to get passed my Windows log-in password).  Here are some safe practices I use with my Evernote Desktop:

1.  Make “signing out” a habit

Is it a pain in the rear to sign into your Evernote account every time you boot up your computer?  Sure.  However, consider this:  Is it more of a pain to sign in your account every time or having someone access your Evernote account and you trying to prevent as little as damage as possible by changing your password and other potent data?  Once you sign out of your Evernote account, you’ll be more secure than just staying signed in the entire time:

If someone steals your computer, don’t make it easier on them by just letting them into your Evernote account with no effort at all.  By not selecting the “stay signed in” option, it makes whoever steals your computer put in your user id and password (see the bottom of this post for tips on how to create a strong password).

Again, this makes things a lot less easy for you to sign in to your account–but anything that’s easy for you is equally easy for for any would-be thieves out there as well.

2.  How to encrypt sensitive data in a Evernote note

We talk a lot these days about going digital in the classroom–everything from assessments, projects, and record keeping.  For educators, some might keep sensitive student data (such as contact information or student ID numbers) in the “cloud” for access to wherever they are at.  The one thing that should be discussed and considered is how safe that data will be once you place it in the online database.  With Evernote, you can add a 2nd level of security to any note data by “encrypting” it in the Evernote note.  Here’s what it would look like and how to do it:

Example of text in a Evernote note:

With this feature in Evernote, encrypting sensitive data might be something you would want to consider.  As in this example, should you choose to use Evernote to keep information about your students, you can encrypt it to make sure that if someone is able to hack into your Evernote account they will have to also hack into the encrypted information.


Example of how to select data you want to encrypt:


Example of creating a encryption password in Evernote:

As with any password, you’ll want to create a strong password for your encryption password as well.  Be sure to check out the end of this post for more information on how to create strong passwords.

(Image credit: Screenshot by Ed Rhee/CNET “How to encrypt selected text in Evernote“)


How data encryption looks once you are done:

Once you are done, that data will now be “encrypted” for more security.  As you can see in this image, the data is no longer visible just by signing into your Evernote account–you will be required to enter your encryption password to access that data as well.  You can do that by double-clicking the encrypted image and it will then prompt you to enter in your password to get access to it.

Safety tips for your mobile device

Safety while on your mobile device is something that should be practiced just as much as safety while on a computer.  Fortunately, Evernote also takes safety on mobile devices into consideration by allowing you to set up a “pin lock” on your Evernote account.  It is important to note, however, that this is a “premium” feature.  Here’s a post on what you’ll get with Evernote premium, “Ten reasons to go premium“.

Here’s an example of what the “pin lock” feature looks like on Android.  Once you go to the Evernote app, you’ll be prompted to enter in your pin number in order to access your account.  This really is a excellent feature to use for security on your phone, should you happen to lose your phone or if it gets stolen.  You can enable this feature on the Evernote app by going to settings—–>other options–>setup pin lock (Android).  You can do the same thing on your tablet or Ipad should you choose to have that 2nd level of security as well.

Other Security Resources

Though the main purpose of this post is to discuss security with Evernote, it is also important to emphasize the importance of practicing good security measures when you are using your computer and when you are connected to the internet.  Here are some resources that might give you some ideas on how to stay secure on your computer and electronic devices, as well as on Evernote:

Evernote

Evernote privacy policy

Evernote’s Three Laws of Data Protection

Freetech4teachers.com:

Three simple tools for creating strong passwords

Resources for Safer Internet Day

Cell Phone Security

Android security

Iphone security

Educationaltechnologyguy.com

E-safety resources

Please see my other posts in this series, Evernote for the Social Studies:

Part 1: Evernote for the Social Studies: What is Evernote

Part 2: Evernote for the Social Studies: Evernote in the History Class

Part 3: Evernote for the Social Studies: Evernote and Skitch

Part 4: Evernote for the Social Studies: Lesson Planning with Evernote

Part 5: Evernote for the Social Studies: Evernote and Study Blue

Evernote for Educators Livebinder


Part 5: Evernote and Study Blue

Continuing on with our “Evernote for the Social Studies” series, I thought it would be appropriate to discuss how we can use Evernote to teach about the 2012 Presidential Election, seeing as how the presidential election is just over a month away.

Now is a great time to be a Social Studies teacher, especially if you teach Government.  With all the issues being discussed during this political election year, there is a vast sea of resources for teachers and students to observe and study over.  In fact, there are so many articles that are written and so much terminology that’s thrown around it can be overwhelming at times.  Luckily, there are two awesome tools that teachers and students can use to gather and organize these resources…Evernote and Study Blue.

What is Study Blue?

We live in a world where everything is digital.  Everything to paying bills online, finding news articles, and yes, even studying.  Teachers and students now locate and share their content online, making the learning experience more engaging.  Online tools such as Evernote, Livebinders, and Google have provided ways for teachers and students to gather that content and present it online.  However, when  it comes time to study, what digital tool is there to facilitate that need?  Enter Study Blue.

Study Blue is essentially what I like to call “21st century studying” or what Study Blue calls “your digital backpack”. Studying has evolved beyond opening a text book and looking for key terms in the glossary, we now incorporate pictures, audio, and technology into the studying experience.

Study Blue

What is also nice about Study Blue, is that allows you several different ways of studying and adding studying materials:

With your study materials, once you have created your flashcard set, you have the option of studying as a review sheet, quiz, or as flashcards right their on your computer.  However, you might wonder what happens if not all of your students have access to a electronic device?  Study Blue also allows you to print off your flashcard set and cut them up into a hardcopy flashcard set or even export them into a Excel spreadsheet.  Here’s the link to a flashcard set of mine to see what it looks like when you select to print them off:  US Election Volcabulary. (Link opens in Evernote).  You can also share the URL to the flashcard set to Facebook, Twitter, and email (though whoever you share the link with must be signed in to their Study Blue account to be able to view it).

Studying Goes Mobile

With all of our technological advancements today, students are usually connected to some kinda of electronic device.  Text books are not the only means of studying now.  Students are now studying with the phones, tablets, and laptops.  Here’s a interesting graphic from Study Blue that shows some data about how studying has evolved over the years:

With Study Blue, students can study anytime they have their cell phones–in between classes, on break at work, or whenever they have free time.  Even better, Study Blue allows you to connect your material on their website to your Evernote account.

Study Blue and Evernote

Once you sign up for a Study Blue account (which is free, by the way), you can choose to go under your profile preferences and connect your Evernote account to your Study Blue account.  Once you have connected your two accounts, a new notebook in your Evernote account will be created, called “Study Blue”:

Let’s say, for example, that your students keep their class notes in their Evernote account.  If they prefer, when they want to study said notes, they can simply copy that Evernote note and move it into the Study Blue notebook.  Once that is done, that note will now be in their Study Blue account and they can simply go log into their Study Blue account and retype that note into flashcards.

How does this help the teacher?

Going back to how Study Blue and Evernote can help you teach the 2012 Presidential Election, one of the main things your students might have issues with is keeping up with the terminology.  Politics can have a slew of terms, which from a student’s perspective can be very overwhelming.  If you want to give your students some extra time with the terminology, creating and sharing these flashcards can be extremely beneficial.  If allotted the extra time, students might have a easier time with it during class, thus cutting back the time which you would have to revisit the terms and material.  Here’s the link to my Study Blue flashcards, or if you don’t have a Study Blue account, here’s the link to the notes in my Evernote account:  Study Blue link or Evernote link.

All of this is just a sampling of what you can do with Study Blue.  Sign up for a account today and give it a try!

For more information, here are more resources:

Studyblue.com

Evernote blog post on Study Blue

Part 1: Evernote for the Social Studies: What is Evernote

Part 2: Evernote for the Social Studies: Evernote in the History Class

Part 3: Evernote for the Social Studies: Evernote and Skitch

Part 4: Evernote for the Social Studies: Lesson Planning with Evernote

Evernote for Educators Livebinder

Part 4: Lesson Planning with Evernote

Lesson planning is a huge component of any educator’s classroom.  We have to breakdown the instruction into several considerations to give our students the best means of learning the objective–i.e. what is the objective of this lesson, what resources will I/students use, what activities will be incorporated, etc.  Once it is all said and done, a lesson plan can be bursting with content and resources–which can be quite overwhelming for the teacher.  Wouldn’t it be nice if we had a “central hub” to gather all of our resources for quick and easy access?  Enter Evernote.


The more I get hands on with Evernote, the more I’m finding out about the extensive ways in which Evernote can be used in education.  One way that Evernote is making a teacher’s life easier is by making lesson planning much easier and streamlined.  Two educators that are apart of my PLN on Twitter, Melissa Seideman and David Andrade, are also huge fans of Evernote.  I recently asked if I could share their experiences with using Evernote and they agreed.  Here’s their testimonies:

Melissa Seideman:

Lesson Plans

The first set are screen shots are of my lesson plans. I got the idea of lesson plans using Evernote from twitter and I will never go back to any other type. I organized each class into a separate notebook and I created notes for each unit. The hardest part was setting up the lesson plans but once it was set up it’s so easy to just enter information.

Here are Melissa’s screen shots for lesson planning:

Example 1:

Example 2:

Example 3:

Example 4:

I find Evernote for lesson plans to be one of the most time saving technologies I have implemented into my classroom. I have my lesson plans on every device thanks to Evernote. I can make a change with a simple click on my phone, ipad, or computer. Every change syncs and keeps me organized. I am also making notes in each lesson to change if I teach the same course next year.  I have also shared my lesson plans with members of my department as well as my principal. I highly recommend using Evernote for lesson plans.


Using Evernote for Student Portfolios

My seniors are doing a final portfolio project using Evernote. The project is very detailed with each step of the project. It took a few days of getting students adjusted to working in Evernote rather than opening word, but the progress is beautiful. They shared their project notebook with me and I can see every change as well as the progress each student makes.   I attached a few student projects. I also created a shared notebook that I shared with them such as my how to guide, what if I am absent, and a sample portfolio layout. This project is truly digital in every sense including the directions for each project work day.

Here’s Melissa’s screen shots for student portfolios:

Example 1:

Example 2:

Example 3:

 Example 4:


Example 5:

Evernote is a great way to teach our students to be digitally responsible, organized, and literate. My hope using Evernote they will find other uses for cloud computing as well as ways to successfully use technology outside of school in the real world.


David Andrade

Evernote is my main lesson and resource organizational tool. I have notebooks setup for lesson plans and lesson resources, along with notebooks for things to do, things to research, and things to share. My lesson plan notes are set up by unit and have the objectives, links, resources, and attached files (like handouts and lab packets). I also have notes setup by week that I use to keep track of where each class is and to schedule my plans out. I can easily share resources and information with my students or colleagues. I have notebooks for faculty meeting notes, ideas for future lessons, Android tips and resources, technology support, and personal notebooks for financial notes and account information, recipes, travel plans, and much more.

In the image below, you can see my lesson plan notebook. It has my schedule for each week with what I am going to do in each class, each day. I also have notes with my unit and lesson plans, links to other resources, notes, and I have attached the files I use with each class.

Lesson Plan objectives:

David’s post on winning Evernote premium for himself and his classes for a entire year:

I just won a very cool contest Evernote hosted for educators. Along with 9 other teachers, I won a year of Evernote premium for me and all of my students, along with training and support to implement it with my class.

I have been using Evernote myself for years and always share it with my students, but this will be my first year really using it with them. I’m learning more about sharing notebooks and setting up groups and classes with Evernote. The first webinar from Evernote was great and we have a Yammer group for support, as well as more training from Evernote throughout the year.

Students have already been using Evernote to take notes and upload files from me and attach them to their class notes. Many are also taking pictures of notes on the board and uploading them to Evernote. I’m also having them submit assignments to me via Evernote. Each class has a notebook and the students tag anything they send me with their name for easy sorting. This will become their online portfolio. Students can share notes with me or email me files right into Evernote.

They are getting so used to it already, that when I say “where should you save this?” they automatically answer Evernote.

You can follow David on Twitter or his blog (Twitter: @Daveandcori, Blog: Educationaltechnologyguy)

I highly recommend you follow Melissa and David, they have shared some great things involving a vast area of education.

What do you think?  Give Evernote a try!

More resources for using Evernote:

Evernote for Educators Livebinder

Evernote for the Social Studies:

Part 1: What is Evernote?

Part 2: Evernote in the History Class

Part 3: Evernote & Skitch for the Social Studies

Part 3: Evernote & Skitch for the Social Studies

Welcome, Social Studies teachers!  Over the last couple of weeks, we have been introduced to what Evernote is and how you can use it.  Of course, once you get started with Evernote you’ll discover all kinds of ways you can use–both in the classroom and your personal life.

Last week, we looked at how Evernote can help students and teachers in History class.  For those of you who teach History, hopefully you’ve had a chance to try Evernote out for yourself and your students.  Please share if you have!

Evernote for Geography Class

Continuing on into my “Evernote for the Social Studies” series, I wanted to take a look this week at how Evernote can help Geography teachers.  With Geography, we look at a lot of maps and physical features.  We show students pictures of different terrains and land features and discuss differences and similarities among them.  Geography teachers will sometimes print off maps and have students label and color them, which may work for getting students familiar with certain items, but it’s not extremely engaging.  If you want to have more ways to engage your Geography students, allow me to introduce you to Skitch.

What is Skitch?

Skitch is a free tool, purchased by Evernote last year, that allows you to annotate and create images.

Here’s a short video of some uses for Skitch:

What is great about Skitch, not only can you save your images to your Evernote account, you can also share your images via Twitter, Facebook, Google Plus, Pinterest, and email.  This way, if you have ever been out and about and ran across something that you would love to share in class, all you have to do is launch the Skitch app, snap the photo, annotate and share to your heart’s desire.

Here’s a example of a screenshot I took on my HP Touchpad (rooted to run Android) via the Skitch app of the United States.  Once I annotated and saved the image into my Evernote account, I had it wherever else I had Evernote installed.  Check it out:

Engaging your Geography students with Skitch

One thing that I feel strongly in is that learning is not confined to the walls of the classroom, learning can occur all around us.  Coloring maps and seeing pictures is one thing, but having students going out and taking pictures of the landscape of which they live in is far more engaging.  What’s nice about doing something like this is that a expensive camera is not required.  Thanks to today’s technology in smartphones, most students already have a camera available to them just by having a cell phone.  I’m sure that there are some students who do not own a cell phone, however, I believe the biggest majority of them do.  When I was doing my student teaching, a majority of my kids (which the school was in a low socioeconomic status) owned a cell phone.  What’s great about mobile technology is that it can be a great tool to engage students in the learning process.  Going out and having students experience their own “backyard” is much more engaging that just seeing images in the classroom.  Here’s a few examples from when I went to the Palo Duro Canyon–the 2nd largest canyon in the United States, located near Amarillo, TX:

Map of Palo Duro Canyon State Park:

Yucca Plants:                                        Red Claystone:

How does this help the teacher?

As educators, our minds are always on how can we present learning in ways which will reach our students.  If you are like me, you’ll see something that could be a great idea to use in the next lesson or something that you can utilize in the classroom.  With Evernote and Skitch, you can take a snapshot of whatever you come across, annotate it, and save it to your Evernote account for future reference.  As with the images I’ve shared also, you can explain certain attributes of Geography a little easier and engage your students to explain what they’ve come across as well.

Conclusion

Once your students save the image in Skitch, they can save it to their Evernote account and share that image via Twitter, Facebook, email, or via the note URL.  If all students were allowed access, I would think that allowing all of your students to “Tweet” their photo to the rest of the class would be a great way of sharing and a strong way to get them engaged.

These are just a few examples of what you could do with Skitch in the Geography classroom.  The best thing I like about doing something like this is this could have the potential to spark interest in students who may have never been engaged otherwise.  What if we took a chance and did something like this in class and the end result was the students becoming life-long learners?  We don’t want our kids to stop learning after they’ve left our class, we want them to continue and excel their learning.

Give Evernote and Skitch a try, you’ll be surprised of all the possibilities that you and your students will come up with.

For more information, here are some useful links:

Part 1: Evernote for the Social Studies–What is Evernote?

Part 2: Evernote for the Social Studies–Evernote in the History Class

Evernote Livebinder

Part 2: Evernote for the Social Studies

Last week, I posted at what you can do with Evernote.  Hopefully you’ve had a chance to get hands-on with Evernote in the last few days and got a feel for how awesome it really is.  Once you do get started with Evernote, you’ll wonder what you did without it.

Evernote in History Class

(Photo courtesy: Library of Congress)

Continuing on in the “Evernote for the Social Studies” series, today I wanted to take a look at how Evernote can help students in History class.  For this post, I contacted a former student of mine and asked if she would be willing to take a few minutes with me and take a look at what Evernote could do for her in her History class.

Digitize and Organize your notes

As I sat down with her and we began to discuss what she was doing in her classes, she showed me some of the notes that she had taken in her class.  Currently, she’s in 8th grade and taking a United States History class from Colonization period to the end of Reconstruction of the American Civil War.  The notes had been done on loose-leaf notebook paper and she kept them in a folder specifically for that class.  As we discussed the positives and negatives of taking and retaining notes that way, the one thing that concerned her was loosing her notes.  Here’s where I showed her where Evernote could step in and take care of that problem.  To start off with, we created a new notebook “US History Notes” in her Evernote account (age requirement is 13 yrs old for any users of Evernote, see the privacy policy).  Using the Evernote app on her Ipod Touch, we took a snapshot of her notes:

She like the idea of creating a “notebook” specially for her US History class for quick and easy organization.  What I also showed her as well was how Evernote can help her refresh on her notes and prepare for a test.  On the notes above, we looked at Evernote’s search feature to quickly find needed notes.  Once she took the snapshot of her notes, she would title them–i.e. Jamestown notes:

Notice how performing a search of “jamestown” in her Evernote notes came up with her Jamestown notes and how Evernote highlighted the searched term in yellow.  As a side note, if you are a premium user you can also search for text in the image themselves.

At the end of our discussion of Evernote, she said she was going to try using Evernote for the next couple of weeks and see how it will help her.  I’ll be updating everyone as she continues to use Evernote over the next few days.  In her words, she classified Evernote as “cool”.  Yes my fellow educators, Evernote will make your students say “cool”.


Staying up-to-date on current events with Evernote

The interesting part of history is that it does’t stop, history happens every day.  If you plan on having your students keep up with current events throughout the school year, why not have them clip articles with Evernote?  As my former student did for her history notes, have your students create a notebook in their Evernote account and name it something like “Current Events”.  If they have the Evernote Webclipper installed on their internet browsers (weather it be at home or at school) they can clip a article that they like or over a topic that you choose for them.  Here’s an example of article I clipped and also added a short response, the article is over the events in Libya.  What’s good about this is that students can email you the article they clipped or share in on Facebook, Twitter, or copy the note URL and put it in their Livebinder.


How does this help the teacher?

When I was student teaching, I had students who lost their notes, forgot to bring them to class, and everything in between.  As we discussed in the first post of this series, students can access their notes from their computer, tablet, or mobile device.  When a student scans their notes into their Evernote account, they won’t be able to say “I lost them” or “I forgot them”.  Of course, as the teacher, you might consider typing or scanning your notes into your Evernote yourself.  This way, if you do want to share your notes with your students, you can share them the same way your students can.  Here’s how to share notes and notebooks.


Conclusion:

Hopefully this gave you some ideas on how you might use Evernote in your History class.  As with any technology tool that is used in the classroom, the main goal of it is to use it to engage the students and nurture them to become life-long learners.  Once I showed Evernote to my former student, she automatically started to see things that she could do with it.


Next week, we’ll look at how Evernote can help in the Geography class.  Looking forward to sharing more ideas for using Evernote the Social Studies classroom!